For travel and camping enthusiasts, power is one of the most limiting challenges of off-grid ecstasy.
Compared to shore power or generators, a power inverter is a better and easier way to generate uninterrupted power in an RV or camper.
Can an invertor be mounted vertically?
Inverters can be mounted vertically as long as there is no obstruction to the fan opening and the inverter has enough space for the heat to dissipate efficiently.
The primary function of an inverter is to provide AC power for electronics and appliances in RVs. It draws 12-volt DC power from your RV’s battery and changes it to 120-volt AC – the voltage needed to operate electronic appliances.
It can also charge the battery when you are plugged into shore power.
Inverters can vary in size based on needs. Some RVers need to charge a laptop or watch TV. Others need the power to operate microwaves, coffee machines, and larger appliances.
You can read more about that in my post on the best inverter size to run a fridge, TV, and air conditioner. Check out this article here.
This article goes over the inverter install process, answering questions about how to mount an inverter and the pros and cons of mounting it in different orientations.

How do you mount an inverter?
RV users have to work with space constraints and inherent limitations based on the size of their vehicle. It’s not unusual to find creative and abnormal ways to mount an inverter in such situations. Luckily, there are no special allowances to be made.
- The process of installing an inverter in an RV is the same as installing it in your home or office.
However, there may be some exceptions based on the make/model of the inverter. Let’s look at the step-by-step instructions before we discuss orientation.
Step One: Find the Right Inverter
The first (obvious) step is to choose the best power inverter that matches your needs and budget. Assuming you have completed that task by reading this article, the next step is to find a space in your RV to install it. You need the following components to install and inverter:
- Power Inverter and Battery
- Screws, screwdriver and/or bolts and wench
- Connectors and AWG cable
Step Two: Find the Right Spot
Most people prefer to install an inverter in the cargo hold.
However, every camper or RV has a different layout, so many different spots could work. Pinpoint the spot as per your preference.
It should be a flat surface in an area that is spacious, safe, and close to the RV’s battery from which the inverter draws power.
Spacious implies that the spot has enough room to seat the inverter while allowing for sufficient air circulation.
Additionally, the inverter should be placed in a way that it doesn’t become a hindrance. For instance, the inverter can become a bother if you install it at foot level.
Safety-wise, pick a dry location where no activity exposes the inverter to moisture or water. Lastly, do not place the inverter in the RV’s battery compartment or close to flammable materials or heat sources.
Step Three: Mount the Power Inverter
The next step is mounting the inverter on a horizontal or vertical surface. A perpendicular wall with shade is favorable. Avoid placing it near wet or flammable materials.
Ensure that you have the hardware to mount the inverter in your RV. Most inverters contain all necessary mounting hardware with pre-drilled holes in the back/front plate. Measure the holes, use the bolts or screws, and secure the inverter to the flat surface.
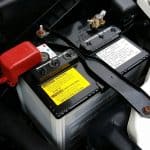
Step 4: Wire the Inverter to the Battery and Ground it
Generally, you connect the power inverter to the RV’s battery via AWG cables. Opt for high-quality and thick cables for optimal energy transfer. You need to ground the inverter with a ground cable i.e. grounding the wire to the vehicle’s chassis.
That said, each inverter is different, so refer to the manufacturer’s recommendations in the manual.
Only attempt this if you have the technical expertise needed for electrical work and wiring. I recommend hiring an expert or licensed electrician to do the job as it can be dangerous.
Check out this YouTube video to see how it’s done.
Do you need an electrician to install an inverter?
There are lots of DIY guides to installing an inverter.
Nevertheless, you are working with electricity. That means you must understand what you are doing and take precautions. Small inverters are relatively easy to install. Larger inverters need hard-wiring and fusing. It’s best to seek professional help as there is a lot to consider.
Can an inverter be mounted vertically?
Generally, inverters are mounted horizontally on a vertical surface.
An inverter can be mounted vertically on a vertical surface as long as it does not present a hazard for the fan opening.
The inverter will generate heat under heavy output loads. The fan is crucial for cooling the inverter, and fan side up or down would be a suboptimal way to mount a power inverter in an RV.
Heat always rises, so having your inverter mounted vertically may not allow heat to dissipate efficiently.
It’s not a deal-breaker. Most inverters have thermal management, so they will shut down if the temperature gets out of hand. It will only happen if the output load is high.
Use a Drip Shield:
However, there are other reasons to avoid fan-side-up mounting. There is a possibility of something falling into the vent that could be conductive (like a screw) and cause a short.
Dust can also clog up the fan, resulting in suboptimal operations.
You can remedy this by installing a drip shield over the inverter. Check if your manufacturer sells one of these.
Drip shields are fairly inexpensive. They are generally mounted with screws with a 2 to 4-inch gap between the shield and inverter.
Can you mount an inverter upside down?
It is considered less-than-ideal, but you can mount an inverter upside down (hanging from the roof). An inverter has no moving parts.
You can mount in any direction, but an upside-down orientation can expose the fan opening. The fans will be blowing air top to bottom, which can clog things. The upside-down orientation may also negatively impact heat dissipation.
All inverters generate heat to stabilize their operating temperature.
The fan helps the inverter cool down and reduces stress on the components. If you mount an inverter upside-down, it may occasionally reset itself if heat builds up.
RV users commonly suspend an inverter below the mounting brackets and use a shield to prevent dust from clogging the fan. Again, you can buy an aftermarket shield and mount it above the vent grill. It will add to the overall cost but is an easy mod.
Check the manufacturer’s manual or speak to an expert to check works for your specific inverter.
Look up sealed inverters if you have severe constraints. Sealed inverters cost more, but they can handle harsh environments and creative mounting.
Can you mount an inverter on a wall?
You can mount an inverter on a wall vertically or horizontally.
Most inverter units have front and back plates with pre-drilled holes. With the help of bolts and screws, you can mount an inverter on a wall as long as the surface is supportive.
As discussed earlier, inverters have built-in fans. Ensure that the orientation does not block airflow and interfere with heat dissipation.
Regardless of orientation, RV users should avoid mounting a power inverter on any high vibration surface, near a heat source, or in the proximity of corrosive elements. For instance, placing the inverter near a heat source like the engine compartment will affect the life of the inverter.
What is the best orientation to mount an inverter in an RV?
Finding the ideal spot and orientation is the best way to optimize the output and performance of your inverter.
Mount an inverter vertically or horizontally on a stable surface that is free of vibrations. Pick a spot that is cool and well-ventilated.
All inverters produce heat and have a self-cooling mechanism. They may reset if the operating temperature reaches high levels.
Steer clear of surfaces that heat up, especially spots on the north side as it bears the brunt of midday sunlight.
Mounting it in the east direction would be ideal. Either way, the inverter should not be exposed to dust, moisture, or water. It should not interfere with any essential activity.
Modern inverters are usually very quiet.
Some models, especially the older ones, may generate a humming or buzzing sound during high output periods. Check the product manual for noise data and avoid mounting it where it can become a hindrance.
In Conclusion
It’s a joy to have inverters when you are dry camping or away from 120-volts AC access.
Recreational vehicles have to work with a limited number of areas. It makes installation somewhat challenging. Orientation also becomes a significant step in mounting an inverter.
I hope this was a helpful guide on how/where to mount an inverter in your camper, boat, or RV.
You should have an optimal experience as long as your inverter is clean, away from footfalls, and safe from heat and moisture.